안녕하십니까! 저번 회원가입 기능에 이어서 게시판 기능을 구현해 보겠습니다. 게시판은 리사이클 뷰를 사용하여 구현을 했으며 인스타그램처럼 편하게 내리면서 볼 수 있게 구현해 보았습니다! 사용되는 함수에 대한 자세한 설명은 '로그인 기능 구현' 게시글에서 이미 해놓았으니 아래 링크를 참고해 주세요.
로그인 기능 구현(Kotlin - php - mysql)
[Android Studio] (Kotlin ↔ PHP ↔ MYSQL) 연동을 통해 로그인 기능 구현하기
안녕하세요! 이번시간에는 Kotlin을 통해서 PHP와 통신하여 MYSQL(DB)에 있는 정보를 가져오는 코드를 짜보겠습니다. 우선 컴퓨터에 설치할 준비물은 다음과 같습니다. 준비가 끝나셨다면 밑에 내용
jamesbexter.tistory.com
0. 완성본 미리보기
로그인 이후 SubPage에서 (작성자, 제목, 작성일)이 포함된 게시판을 볼 수 있습니다.
1. subpage.php (게시글 정보를 가져오는 서버코드)
> 게시글 정보를 db에서 select 문으로 가져와서 $post[] 배열에 json형식으로 저장해주는 코드입니다.
<?php

include 'dbcon.php';


//subpage.php
session_start();
session_cache_expire(60);// 세션 유지시간 1시간

$inputJSON = file_get_contents('php://input');
$input = json_decode($inputJSON, TRUE); // Json 형식에서 배열로 디코딩 ,$_POST를 사용할 수 없기 때문에 이것을 사용.

$search = $input['search'] ?? '';   //입력값이 없으면 빈 문자열로 처리


$sql = empty($search) ? "SELECT * FROM post_info" : "SELECT * FROM post_info WHERE post_title LIKE '%" . $search . "%'";   //search가 공백이면 전자 ,아니면 후자
$result = mysqli_query($db, $sql);

$posts = []; //게시글 정보를 담을 배열 생성

while ($posting = mysqli_fetch_assoc($result)) {    //게시물이 없을때 까지
    $posts[] = [    //게시글 정보를 담은 배열
        'title' => $posting['post_title'],
        'writer' => $posting['post_writer'],
        'gender' => $posting['gender'],
        'date' => $posting['post_date']
    ];
}

if (!empty($posts)) {
    echo json_encode(['status' => 'success', 'posts' => $posts]);
} else {
    echo json_encode(['status' => 'error', 'posts' => '게시글이 없습니다.']);
}


?>
2. 리사이클뷰 생성
2.1 . Post.kt
> 우선 게시글을 나타내기 위한 클래스인 Post라는 클래스를 만들어주었습니다.
package com.example.test_app

import java.sql.Date

/*
클래스 모델 객체
*/

class Post (val gender: Int,val writer:String,val date: String,val title:String)
{
    override fun toString(): String {   //커스텀 클래스기 때문에 toString을 재정의 안해주면 문자열이 아닌 메모리주소값 반환
        return "Post(gender=$gender, writer='$writer', date='$date', title='$title')"
    }
}
2.2 list_post.xml
> 그다음으론 리사이클뷰에 사용할 UI를 만들어주었습니다.

↑ Post_list 의 UI
↓ Post_list 의 코드
<?xml version="1.0" encoding="utf-8"?>
<androidx.constraintlayout.widget.ConstraintLayout xmlns:android="http://schemas.android.com/apk/res/android"
    xmlns:app="http://schemas.android.com/apk/res-auto"
    xmlns:tools="http://schemas.android.com/tools"
    android:layout_width="match_parent"
    android:layout_height="wrap_content">

    <androidx.constraintlayout.widget.ConstraintLayout
        android:layout_width="0dp"
        android:layout_height="wrap_content"
        android:layout_marginStart="8dp"
        android:layout_marginTop="8dp"
        android:layout_marginEnd="8dp"
        android:layout_marginBottom="8dp"
        app:layout_constraintBottom_toBottomOf="parent"
        app:layout_constraintEnd_toEndOf="parent"
        app:layout_constraintHorizontal_bias="0.0"
        app:layout_constraintStart_toStartOf="parent"
        app:layout_constraintTop_toTopOf="parent"
        app:layout_constraintVertical_bias="0.0">

        <ImageView
            android:id="@+id/iv_gender"
            android:layout_width="60dp"
            android:layout_height="60dp"
            android:layout_marginStart="8dp"
            android:layout_marginTop="8dp"
            android:layout_marginBottom="8dp"
            app:layout_constraintBottom_toBottomOf="parent"
            app:layout_constraintStart_toStartOf="parent"
            app:layout_constraintTop_toTopOf="parent"
            app:srcCompat="@drawable/man" />

        <TextView
            android:id="@+id/tv_writer"
            android:layout_width="wrap_content"
            android:layout_height="wrap_content"
            android:layout_marginStart="8dp"
            android:layout_marginTop="8dp"
            android:text="무너박사"
            android:textColor="#F28A68"
            android:textStyle="bold"
            app:layout_constraintStart_toEndOf="@+id/iv_gender"
            app:layout_constraintTop_toTopOf="parent" />

        <TextView
            android:id="@+id/tv_date"
            android:layout_width="wrap_content"
            android:layout_height="wrap_content"
            android:layout_marginStart="8dp"
            android:layout_marginTop="40dp"
            android:text="27"
            android:textColor="#F28967"
            android:textStyle="bold"
            app:layout_constraintStart_toEndOf="@+id/iv_gender"
            app:layout_constraintTop_toTopOf="@+id/iv_gender" />

        <TextView
            android:id="@+id/tv_title"
            android:layout_width="224dp"
            android:layout_height="60dp"
            android:layout_marginStart="11dp"
            android:layout_marginEnd="8dp"
            android:text="hfd"
            android:textColor="#8BC34A"
            android:textSize="16sp"
            android:textStyle="bold"
            app:layout_constraintBottom_toBottomOf="@+id/iv_gender"
            app:layout_constraintEnd_toEndOf="parent"
            app:layout_constraintStart_toEndOf="@+id/tv_date"
            app:layout_constraintTop_toTopOf="@+id/iv_gender" />

    </androidx.constraintlayout.widget.ConstraintLayout>
</androidx.constraintlayout.widget.ConstraintLayout>
2.3 PostAdapter.kt
> 마지막으로 리사이클뷰에 list를 연결할 Adapter를 생성해 주었습니다. 이 어댑터는 이런 식으로 쓰이게 됩니다.
binding.rvPost.adapter = PostAdapter(postinfo) //리사이클 뷰 어댑터 연결
↓ 리사이클뷰와 list정보를 연결할 Adapter
package com.example.test_app

import android.view.LayoutInflater
import android.view.View
import android.view.ViewGroup
import android.widget.ImageView
import android.widget.TextView
import android.widget.Toast
import androidx.recyclerview.widget.RecyclerView

class PostAdapter (val PostList: ArrayList<Post>) : RecyclerView.Adapter<PostAdapter.CustomViewHolder>()
{

    override fun onCreateViewHolder(
        parent: ViewGroup,
        viewType: Int
    ): PostAdapter.CustomViewHolder {
        val view = LayoutInflater.from(parent.context).inflate(R.layout.list_post,parent,false)
        return CustomViewHolder(view).apply{
            itemView.setOnClickListener{
                val curPos : Int = bindingAdapterPosition
                val post: Post = PostList.get(curPos)
                Toast.makeText(parent.context, "게시글 제목: ${post.title}\n 작성자: ${post.writer}",Toast.LENGTH_SHORT).show() //parent.context 란 adapter 랑 연결되어있는 액티비티
            }
        }
    }

    override fun onBindViewHolder(holder: PostAdapter.CustomViewHolder, position: Int) {
        holder.gender.setImageResource(
            if(PostList.get(position).gender==1) R.drawable.man
            else R.drawable.women
        ) // 구조체로 따지면 PostList[0].gender 와 같은말임.
        holder.writer.text = PostList.get(position).writer
        holder.date.text = PostList.get(position).date
        holder.title.text = PostList.get(position).title
    }

    override fun getItemCount(): Int {
        return PostList.size    //kotlin이기 때문에 배열의 크기를 size 로 가져옴
    }

    class CustomViewHolder(itemView: View) : RecyclerView.ViewHolder(itemView) {    //내부 클래스 <각 항목별 객체생성>
        val gender = itemView.findViewById<ImageView>(R.id.iv_gender) //성별
        val writer = itemView.findViewById<TextView>(R.id.tv_writer) //이름
        val date = itemView.findViewById<TextView>(R.id.tv_date) // 나이
        val title = itemView.findViewById<TextView>(R.id.tv_title) //게시글 제목

    }


}
자 이렇게 작성하시면 이제 리사이클뷰 준비는 완료가 되었습니다. 이제 저희는 Post 클래스로 이루어진 배열을 만든 후 안에 게시글 정보를 넣어서 리사이클뷰 Adapter와 배열을 연결시켜 주면 게시글정보가 리사이클뷰에 뜨게 됩니다. 이제 밑에서부턴 게시글 정보를 DB에서 Post클래스로 담아 오는 과정을 다룰 것입니다.
3. DB에서 게시글 정보 가져오기
3.1 . activity_sub.xml
> 우선 Subactivity의 xml파일에 UI는 이런 식으로 구성하였습니다. 표시한 곳이 리사이클 뷰입니다.
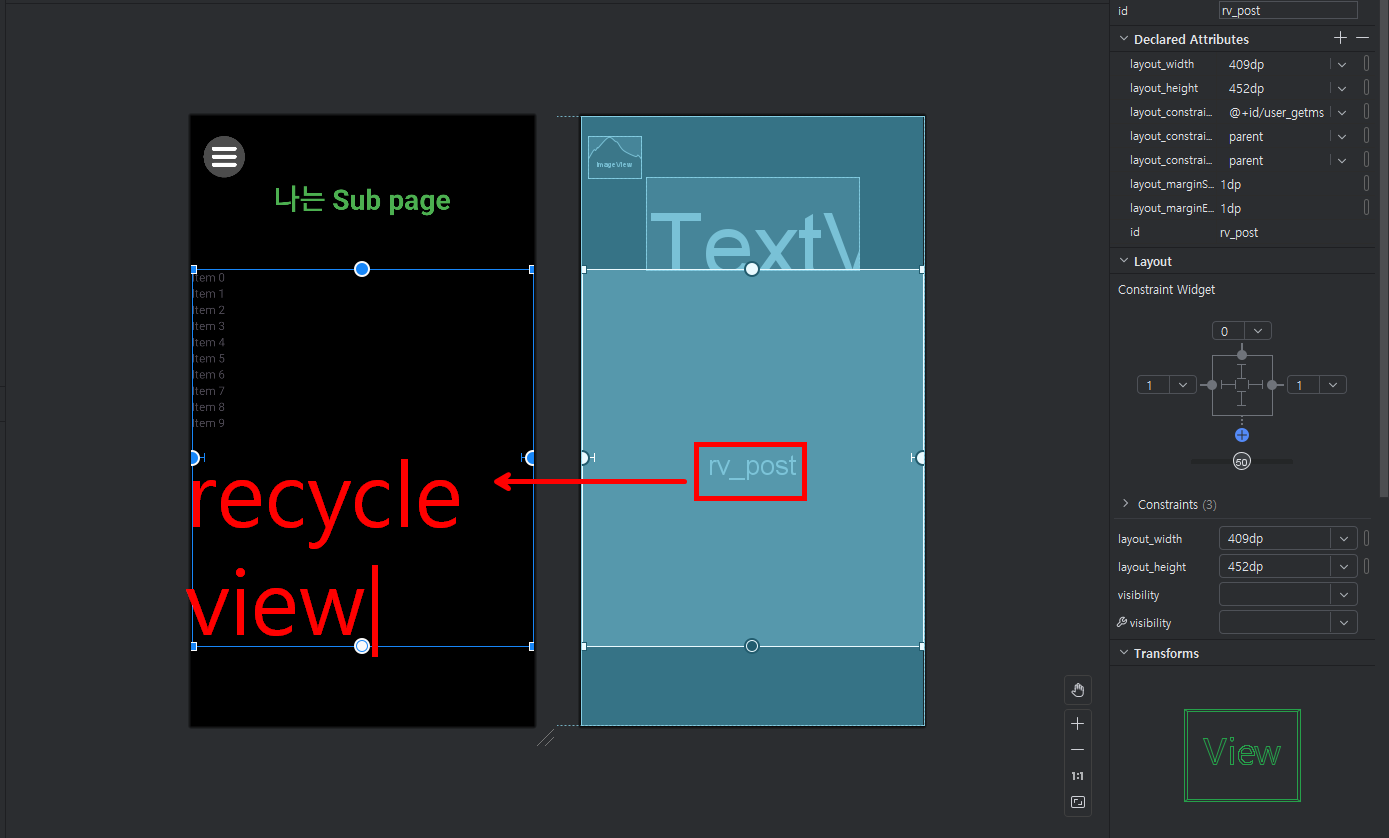
↑ activity_sub.xml의 UI
↓ activity_sub.xml 의 코드
<?xml version="1.0" encoding="utf-8"?>
<androidx.drawerlayout.widget.DrawerLayout xmlns:android="http://schemas.android.com/apk/res/android"
    xmlns:app="http://schemas.android.com/apk/res-auto"
    xmlns:tools="http://schemas.android.com/tools"
    android:id="@+id/layout_drawer"
    android:background="#000000"
    android:layout_width="match_parent"
    android:layout_height="match_parent"
    tools:context=".SubActivity">

    <androidx.constraintlayout.widget.ConstraintLayout
        android:id="@+id/register_layout"
        android:layout_width="match_parent"
        android:layout_height="match_parent">

        <TextView
            android:id="@+id/user_getmsg"
            android:layout_width="255dp"
            android:layout_height="111dp"
            android:text="나는 Sub page"
            android:textAlignment="center"
            android:textColor="#4CAF50"
            android:textSize="34sp"
            android:textStyle="bold"
            app:layout_constraintBottom_toBottomOf="parent"
            app:layout_constraintEnd_toEndOf="parent"
            app:layout_constraintStart_toStartOf="parent"
            app:layout_constraintTop_toTopOf="parent"
            app:layout_constraintVertical_bias="0.117" />

        <ImageView
            android:id="@+id/btn_navi"
            android:layout_width="64dp"
            android:layout_height="50dp"
            android:layout_marginStart="8dp"
            android:layout_marginTop="24dp"
            android:background="#000000"
            app:layout_constraintStart_toStartOf="parent"
            app:layout_constraintTop_toTopOf="parent"
            app:srcCompat="@drawable/meunicon" />

        <androidx.recyclerview.widget.RecyclerView
            android:id="@+id/rv_post"
            android:layout_width="409dp"
            android:layout_height="452dp"
            android:layout_marginStart="1dp"
            android:layout_marginEnd="1dp"
            app:layout_constraintEnd_toEndOf="parent"
            app:layout_constraintStart_toStartOf="parent"
            app:layout_constraintTop_toBottomOf="@+id/user_getmsg" />

    </androidx.constraintlayout.widget.ConstraintLayout>

    <com.google.android.material.navigation.NavigationView
        android:id="@+id/navimenu"
        android:layout_width="wrap_content"
        android:layout_height="match_parent"
        android:layout_gravity="start"
        app:menu="@menu/navi_menu"/>


</androidx.drawerlayout.widget.DrawerLayout>
3.2 . SubActivity.kt (DB에서 게시글정보를 가져온 후 리사이클 뷰에 연결하는 코드)
> 서버에서 출력된 값을 Json 파일로 받아온 후 문자열로 변환하고 , Post클래스로 이루어진 리스트에 넣는 방식입니다.
이후 오류가 없으면 Pair(1, postList)를 반환하고 반환된 postList는 Adapter와 연결되어 리사이클뷰가 동작합니다.
sendPostRequest() 함수는 위에서 언급했듯 '로그인 기능구현' 게시물에서 자세히 다뤘습니다.
package com.example.test_app

import android.os.Bundle
import android.util.Log
import android.view.MenuItem
import android.widget.AdapterView
import android.widget.Toast
import androidx.activity.enableEdgeToEdge
import androidx.annotation.Nullable
import androidx.appcompat.app.AppCompatActivity
import androidx.core.view.GravityCompat
import androidx.core.view.ViewCompat
import androidx.core.view.WindowInsetsCompat
import androidx.recyclerview.widget.LinearLayoutManager
import com.example.test_app.databinding.ActivitySubBinding
import com.google.android.material.navigation.NavigationView
import kotlinx.coroutines.CoroutineScope
import kotlinx.coroutines.Dispatchers
import kotlinx.coroutines.launch
import kotlinx.coroutines.withContext
import org.json.JSONObject
import java.io.BufferedOutputStream
import java.io.BufferedReader
import java.io.BufferedWriter
import java.io.InputStreamReader
import java.io.OutputStreamWriter
import java.net.HttpURLConnection
import java.net.URL
import java.text.SimpleDateFormat
import java.util.Locale

private var mBinding: ActivitySubBinding? = null   //mBinding이 null을 가질수 있다.
private val binding get() = mBinding!!  //!! 를 붙여줌으로써 null 이 아니라는것을 보장.

class SubActivity : AppCompatActivity(), NavigationView.OnNavigationItemSelectedListener {


    override fun onCreate(savedInstanceState: Bundle?) {
        super.onCreate(savedInstanceState)
        enableEdgeToEdge()
        mBinding = ActivitySubBinding.inflate(layoutInflater)  //xml파일과 액티비티 연결
        setContentView(binding.root)    // xml의 부모 바인딩을 가져온다.

        ViewCompat.setOnApplyWindowInsetsListener(findViewById(R.id.layout_drawer)) { v, insets ->
            val systemBars = insets.getInsets(WindowInsetsCompat.Type.systemBars())
            v.setPadding(systemBars.left, systemBars.top, systemBars.right, systemBars.bottom)
            insets
        }


        val search: String = ""	//검색어 기능을 위한 변수 , 지금은 아무런 값이 없음

        /*리사이클 뷰 코드 시작*/


        CoroutineScope(Dispatchers.IO).launch {
            val postinfo:ArrayList<Post> = sendPostRequest(search).second   //게시글 정보를 가진 LIST를 반환
            Log.d("requestresult: ", postinfo.toString())

            withContext(Dispatchers.Main) {
                binding.rvPost.layoutManager = LinearLayoutManager(this@SubActivity, LinearLayoutManager.VERTICAL, false) //수직방향으로 리사이클뷰 설정
                binding.rvPost.setHasFixedSize(true) // 최적화 기능
                binding.rvPost.adapter = PostAdapter(postinfo)  //리사이클 뷰 어댑터 연결

            }
        }


        /*리사이클 뷰 코드 END*/


        /*  네비게이션 메뉴 코드 생략 */
    }

    // 서버로 HTTP 요청을 보내는 함수
    private fun sendPostRequest(search: String): Pair<Int,ArrayList<Post>> {
        val url = URL("http://yourdomain/subpage.php")
        val postData = JSONObject()
        postData.put("search", search)      //json 형식으로 보낸다는것을 주의!! php 에서 $_POST로는 사용불가!

        val result = with(url.openConnection() as HttpURLConnection) {
            requestMethod = "POST"
            doOutput = true

            val outputStream = BufferedOutputStream(outputStream)
            BufferedWriter(OutputStreamWriter(outputStream, "UTF-8")).use { writer ->
                writer.write(postData.toString())
                writer.flush()
            }


            //url로 데이터 전송후 서버로부터 응답을받는 부분
            if (responseCode == HttpURLConnection.HTTP_OK) {
                BufferedReader(InputStreamReader(inputStream)).use { reader ->
                    val response = StringBuilder()  //동적문자열객체 선언(이로인해 이 문자열 뒤로 계속 추가해나갈수있음)이자체로는 문자열이 아님!
                    var line: String?
                    while (reader.readLine().also { line = it } != null) {
                        response.append(line)   //json 응답을 문자열로 가져옴
                    }

                    //JSON 응답을 처리
                    val jsonResponse= JSONObject(response.toString())//응답을 다시 json객체로 변환
                    val status=jsonResponse.getString("status")//응답에서 key=status 인 데이터 저장
                    val postArray=jsonResponse.getJSONArray("posts")//응답에서 posts라는 이름의 배열 저장

                    //게시글 정보를 List로 변환 <PostAdapter와의 호환을 위하여 변환해야함>
                    val postList= ArrayList<Post>() //Post형식의 배열을 가진 동적List 생성

                    for (i in 0 until postArray.length()){
                        val postJson=postArray.getJSONObject(i)//i번째 게시글 정보를 가져온다.
                        val post=Post(
                            title=postJson.getString("title"),
                            writer=postJson.getString("writer"),
                            gender = postJson.getInt("gender"),
                            date = "작성일 : "+postJson.getString("date")
                        )
                        //Post 객체 생성 후 리스트에 추가
                        postList.add(post)
                    }

                    Log.d("HTTP_POST", "Response: $response")   // 결과값 Logcat 으로 확인가능!
                    return@with Pair(1,postList)
                }
            } else {
                Log.e("HTTP_POST", "Error: $responseCode")  //에러발생시 에러코드 출력!
                return@with Pair(0, ArrayList<Post>())
            }
        }
        return result
    }
}
긴 글 읽어주셔서 감사합니다!
'모바일 앱개발(Kotlin-PHP-Mysql)' 카테고리의 다른 글
| [Android Studio] 게시글 CRUD(생성,읽기,수정,삭제)기능 구현 -Kotlin (0) | 2024.10.15 |
|---|---|
| [Android Studio] 게시글 읽기 페이지 구현(CRUD->R) - Kotlin (1) | 2024.10.13 |
| [Android Studio] 무선 디버깅 연결이 안될때 수동으로 연결하는법. (0) | 2024.10.07 |
| [Android Studio] 회원가입 기능 구현 - Kotlin (0) | 2024.10.05 |
| [Android Studio] 로그인 한 아이디 저장하는 기능 구현-Kotlin (0) | 2024.10.03 |